 David Yates.
For a long time, I’ve been trying to figure out just how to get the best of both worlds in terms of running Windows and Ubuntu1 on my desktop PC. I’ve tried the obvious options: I dual-booted Windows and Ubuntu on my laptop for most of my university career, and more recently I’ve tried just running a Windows host with a virtualised Ubuntu in VMWare. Neither of these approaches fully satisfied me.
With dual-booting, the other OS on your system is a full reboot away. If you’re on Ubuntu and want to play a game, or on Windows and want to do some programming, you have to stop, close everything you’re busy with, reboot the computer, choose the other option on your Grub screen, and then log in again. So at best you tend to spend a few weeks in Windows, a few weeks in Linux, and at worst you forget about one of the OSes entirely.
Virtualising Ubuntu on a Windows base improved on that by allowing the use of both operating systems simultaneously: I could put full-screen the Ubuntu VM on one of my monitors and use Windows programs on the other with only the occasional Ctrl-Alt breaking the flow. But I could never get sound to work on my Ubuntu VMs and would often accidentally make the storage too small and have to go through the chore of extending vmdks.
This virtualised usage also meant that I couldn’t really use Linux to operate my PC: the VM only got started for programming tasks. And while I enjoy plenty of Windows-only games and programs, I vastly prefer the heavily configurable and less opaque Linux way for doing everything outside of running those games and programs. It’s also incredibly annoying when Windows 10 runs into a :( face BSOD2 and decides to restart immediately, crashing my poor, innocent Ubuntu VM along with it – if there’s one thing you can say about most mainstream Linux distros, it’s that full system crashes don’t really happen.
GPU passthrough seemed like exactly what I needed. Luckily, I had a spare SSD I wasn’t using for much, so I was able to isolate an experimental passthrough Ubuntu install to that SSD without touching my Windows installation on my PC’s other SSD. Once I was sure that everything worked (a much quicker process than anticipated) I replaced that Windows install with a Windows VM and went full passthrough.
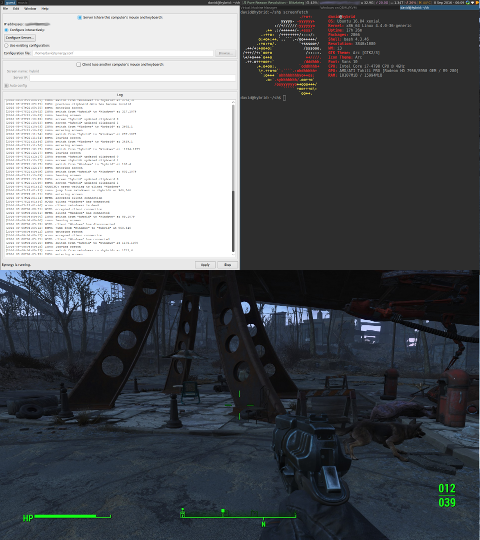
Fallout 4 below, screenfetch above, Synergy in control
That was a few months ago, and so far I’m very happy with the setup. It wasn’t completely straightforward, and I did experience a couple moments of despair where I thought some tiny but important feature or behaviour was impossibly incompatible with my setup, but ultimately I got everything working, to the point where I’m writing this guide to save others the same despair and frantic googling.
Much of the guide to follow is paraphrased from other sources, to which links have been provided. You’ll probably need to refer to them and others while setting this up, because what worked on my machine may not work on yours. I’ve also got some help and input from a couple friends and colleagues who’ve also set this up and had slightly different experiences with it.
Parts 1 and 2 detail getting passthrough and your VM setup, and are largely similar to the most popular guides already extant. Part 3 is a bit rarer: it contains a number of small, important things you’ll want to do post-setup to get everything working nicely so you can actually use your setup.
This is a long, detailed post, so here’s a table of contents for easy traversal:
# Part 0: What you’ll need
GPU passthrough relies on some specific virtualisation technologies, so you’ll need to make sure your hardware supports it. If you have a reasonably new graphics card and your BIOS allows you to set an option named something similar to “VT-d” (Intel) or “AMD Virtualization” (AMD), you should be good to go. If not, put it off till your next upgrade.
Once you’ve determined that your hardware is able to facilitate GPU passthrough, you’ll want to gather some other things that’ll make the setup easier to create and use.
- You should have a secondary graphics card. For most people, this will be your CPU’s integrated graphics, but a second PCI-connected card works fine as well.
- You should have at least two monitors. Barring that, you should have two inputs on your one monitor. Barring that, you should go out and buy an HDMI splitter for your single monitor’s single input. But I really recommend two monitors.
- In terms of software, you’ll need a copy of Windows for your guest machine and a copy of Synergy for sharing your keyboard and mouse (there are other options here, but Synergy is my favourite for reasons I’ll explain later).
- It’s not strictly necessary, but if you can spare an SSD for your Windows install, you should. The more hardware you pass through directly to the VM, the better your performance is going to be.
# Part 1: Setting up passthrough
Before you set up your VM, you’re going to want to prepare your system to pass through your GPU. This means freeing it from handling your host’s display, so at this point you’ll want to plug your monitor into your secondary card in preparation (but don’t unplug your primary card just yet). Then we can start following this tutorial (paraphrased and in some places outright copied below).
If you haven’t done so already, enable VT-d/AMD-Vi in your BIOS. You can check it’s enabled with the following command for Intel:
dmesg | grep -e "Directed I/O"
with output like
DMAR: Intel(R) Virtualization Technology for Directed I/O
or
PCI-DMA: Intel(R) Virtualization Technology for Directed I/O
And the following command for AMD:
dmesg | grep AMD-Vi
with output like
AMD-Vi: Enabling IOMMU at 0000:00:00.2 cap 0x40
AMD-Vi: Lazy IO/TLB flushing enabled
AMD-Vi: Initialized for Passthrough Mode
Once you’ve determined that VT-d/AMD-Vi is working, you can move on to locating the graphics card you want to pass through. Run this command with sudo:
lspci | grep VGA
I get this output:
00:02.0 VGA compatible controller: Intel Corporation Xeon E3-1200 v3/4th Gen Core Processor Integrated Graphics Controller (rev 06)
01:00.0 VGA compatible controller: Advanced Micro Devices, Inc. [AMD/ATI] Tahiti PRO [Radeon HD 7950/8950 OEM / R9 280]
The first one is my integrated Intel graphics, the card I want to use for host graphics, and the second is my R9 280, the card I want to pass through to the VM. So I isolate the R9 280 with the following command:
lspci -nn | grep 01:00.
This gives me the following output:
01:00.0 VGA compatible controller [0300]: Advanced Micro Devices, Inc. [AMD/ATI] Tahiti PRO [Radeon HD 7950/8950 OEM / R9 280] [1002:679a]
01:00.1 Audio device [0403]: Advanced Micro Devices, Inc. [AMD/ATI] Tahiti XT HDMI Audio [Radeon HD 7970 Series] [1002:aaa0]
So we’ve found the graphics card. Take a note of those IDs in the square brackets: in my case 1002:679a (graphics) and 1002:aaa0 (sound). Note that we’ll need to send the graphics card’s integrated sound card along for the passthrough because both devices are in the same IOMMU group.
The next step is to tell the OS to catch it with the pci-stub drivers on boot so it will be free to attach to the VM. This is imperative: you can’t pass through a graphics card that’s being handled by graphics drivers in order to display graphics on the host. There are a few ways of doing this, but the most common seems to be modifying your Grub boot loader’s CMDLINE. The file /etc/default/grub should have a line that looks something like the following:
GRUB_CMDLINE_LINUX_DEFAULT="quiet splash"
You’ll need to change it to look something like this:
GRUB_CMDLINE_LINUX_DEFAULT="radeon.blacklist=1 quiet splash intel_iommu=on pci-stub.ids=1002:679a,1002:aaa0"
radeon.blacklist=1tells the system not to load the Radeon drivers – obviously not applicable if you’re passing through an Nvidia cardintel_iommu=ontells to the system to load VT-d (amd_iommu=onfor AMD CPUs)pci-stub.ids=1002:679a,1002:aaa0tellspci-stubto capture our passthrough devices
If you have an Nvidia card, check out Part 4 of that tutorial I linked to above. The solution it gives for AMD cards didn’t totally work for me, so you may have to fiddle a bit. I haven’t personally done this with an Nvidia card, so I don’t want to give false solutions. See the Bibliography section at the bottom of this post for more resources.
Once that’s sorted you’ll need to add this line to the bottom of /etc/initramfs-tools/modules:
pci-stub
Which will actually load the much-discussed pci-stub driver kernel module (shocking!) that’s gonna be doing the heavy lifting of capturing the graphics card so it can be redirected to the VM.
Then add these additional drivers to /etc/modules:
vfio
vfio_iommu_type1
vfio_pci
vhost-net
And update initramfs:
update-initramfs -u
When that’s all in place, restart your PC and check that everything loaded correctly with these commands:
lsmod | grep vfio
dmesg | grep pci-stub
dmesg | grep VFIO
Your output should look something like this:
$ lsmod | grep vfio
vfio_pci               40960  0
vfio_virqfd            16384  1 vfio_pci
irqbypass              16384  2 kvm,vfio_pci
vfio_iommu_type1       20480  0
vfio                   28672  2 vfio_iommu_type1,vfio_pci
$ dmesg | grep pci-stub
[    0.000000] Command line: BOOT_IMAGE=/vmlinuz-4.4.0-34-generic root=UUID=792ede72-4448-43dc-886d-23c5b4338acc ro radeon.blacklist=1 quiet splash intel_iommu=on pci-stub.ids=1002:679a,1002:aaa0 vt.handoff=7
[    0.000000] Kernel command line: BOOT_IMAGE=/vmlinuz-4.4.0-34-generic root=UUID=792ede72-4448-43dc-886d-23c5b4338acc ro radeon.blacklist=1 quiet splash intel_iommu=on pci-stub.ids=1002:679a,1002:aaa0 vt.handoff=7
[    1.469074] pci-stub: add 1002:679A sub=FFFFFFFF:FFFFFFFF cls=00000000/00000000
[    1.469087] pci-stub 0000:01:00.0: claimed by stub
[    1.469092] pci-stub: add 1002:AAA0 sub=FFFFFFFF:FFFFFFFF cls=00000000/00000000
[    1.469097] pci-stub 0000:01:00.1: claimed by stub
[40622.538249] pci-stub 0000:01:00.0: claimed by stub
[40622.554222] pci-stub 0000:01:00.1: claimed by stub
[40713.693527] pci-stub 0000:01:00.0: claimed by stub
[40713.709499] pci-stub 0000:01:00.1: claimed by stub
$ dmesg | grep VFIO
[    1.870411] VFIO - User Level meta-driver version: 0.3
Congratulations, your system is ready for graphics passthrough!
# Part 2: Setting up the VM
There are two ways you can set up your VM. Most of the tutorials I’ve found do it through command line, using a script, but as Alex Williamson has shown, it’s also possible to do most of what’s needed using QEMU/KVM’s virt-manager GUI. This is the approach I opted for and would recommend,3 but I’ll be covering both methods.
# Prerequisites
The first thing to do is install the various Qemu- and KVM-related packages necessary to create and run KVM virtual machines. We’ll also install hugepages, which you can use to reserve a chunk of your system’s RAM for your VM.
To begin, install these packages:
sudo apt-get update
sudo apt-get install qemu-kvm seabios qemu-utils hugepages ovmf
Then check ovmf is installed and working with these commands:
kvm-ok
lsmod | grep kvm
And you should get output like:
$ kvm-ok
INFO: /dev/kvm exists
KVM acceleration can be used
$ lsmod | grep kvm
kvm_intel             172032  0
kvm                   540672  1 kvm_intel
irqbypass              16384  2 kvm,vfio_pci
Make sure you have a Windows ISO for installing your VM’s operating system. Microsoft provides Windows 10 ISOs for download on this page.
Lastly, grab either the latest or the stable build of the Windows VirtIO drivers to enjoy the sweet, sweet speed of paravirtualised network and disk device drivers in your VM:
- Windows VirtIO drivers wiki page
- Latest win-virtio drivers ISO download
- Stable win-virtio drivers ISO download
# Setting up hugepages
You don’t really need to set up hugepages to get GPU passthrough working, but as you’ll presumably be using your VM for games and other system-intensive pursuits, you’ll want to do as much optimisation as possible. So it’s a good idea to reserve some RAM for your VM.
You should be doing this with a system that has at least 16GB of RAM. You might be able to get through with 8, but if you’re serious about passthrough, go out and buy another eight.
Under my setup, I give my VM 8GB of RAM: half of my 16. You probably don’t want to give it less than four.
hugeadm --explain
In /etc/default/qemu-kvm set:
KVM_HUGEPAGES=1
grep "Hugepagesize:" /proc/meminfo
Your huge page size is probably the same as mine, at 2048KB (2MB).
Now you need to figure out how many hugepages to assign. Generally you’ll want to assign your chosen amount of RAM (usually 8GB) plus a small bit of buffer space (between 2% and 10%). Unless you’re rolling in RAM, don’t assign too much buffer space or you’ll start running out of RAM on your main system – due to the nature of hugepages, the RAM you reserve is always reserved, even when the VM’s not running.
Here’s the calculation:
8192M / 2048k + 7.5% = 4300
If you assign more hugepages than your system can handle, your OS will fail to boot.
To reserve 8GB, add the following line to /etc/sysctl.conf:
vm.nr_hugepages = 4300
Obviously, substitute 4300 for whatever number you came to for your system.
# Creating the VM
Would you call yourself a fan of GUIs or of scripts? I’ll admit to appreciating the occasional nice GUI, a description which certainly fits KVM/Qemu’s virtman. But it’s really a matter of personal preference which option you go for, as both will have the same results.
# Using the virtman GUI
I followed this guide. Setting up a Windows VM with the virtman GUI is mostly a simple process of following instructions and clicking Forward. Following the initial wizard, you’ll be given a freeform interface through which to add hardware – and again, most of what you need to do is pretty intuitive and self-explanatory.
First off, remember to set your VM up with UEFI boot if your graphics card requires it (most modern cards will). See the yellow box titled Using SeaBIOS instead of UEFI below if this is not the case.
Storage: For the VM’s hard disk, I used a raw 512GB SSD: the same drive I’d previously had Windows installed on as a base operating system. If that’s not an option for you, you can create an image file through virtman’s interface, or maybe an LVM volume if that’s more your speed. Just make sure to give it a few hundred GBs so you have space for games and whatever else you’ll need.
Processor: As the guide linked above details, you should type the non-standard option host-passthrough into the Configuration > Model dropdown to get the best possible performance.
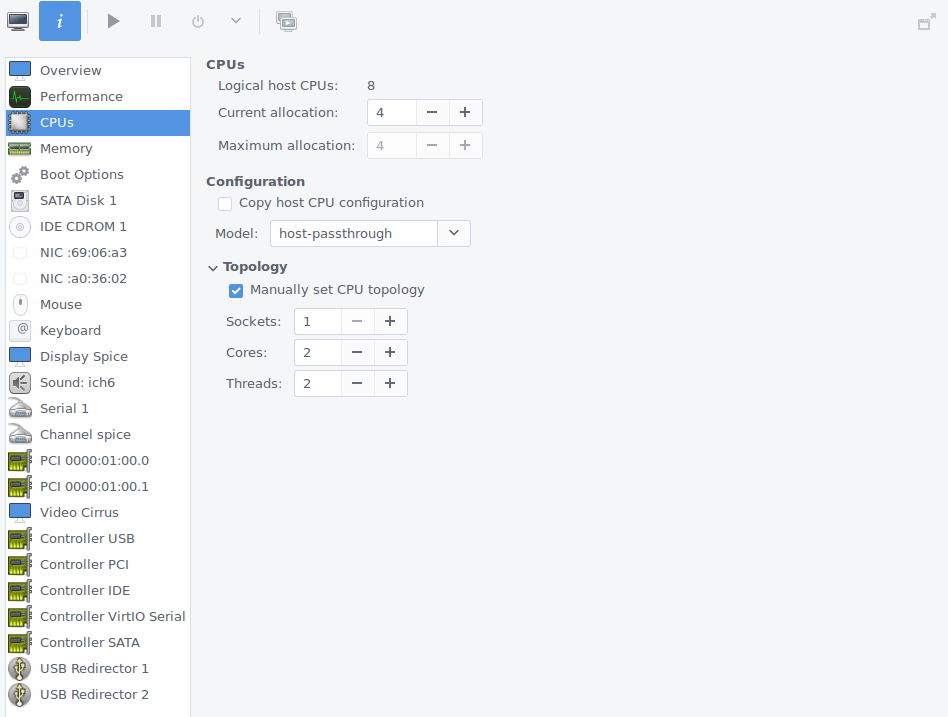
My CPU configuration.
GPU passthrough: One of the hardware types you can add to your host is “PCI Host Device”. Make sure to add everything you’re passing through (graphics card and sound card).
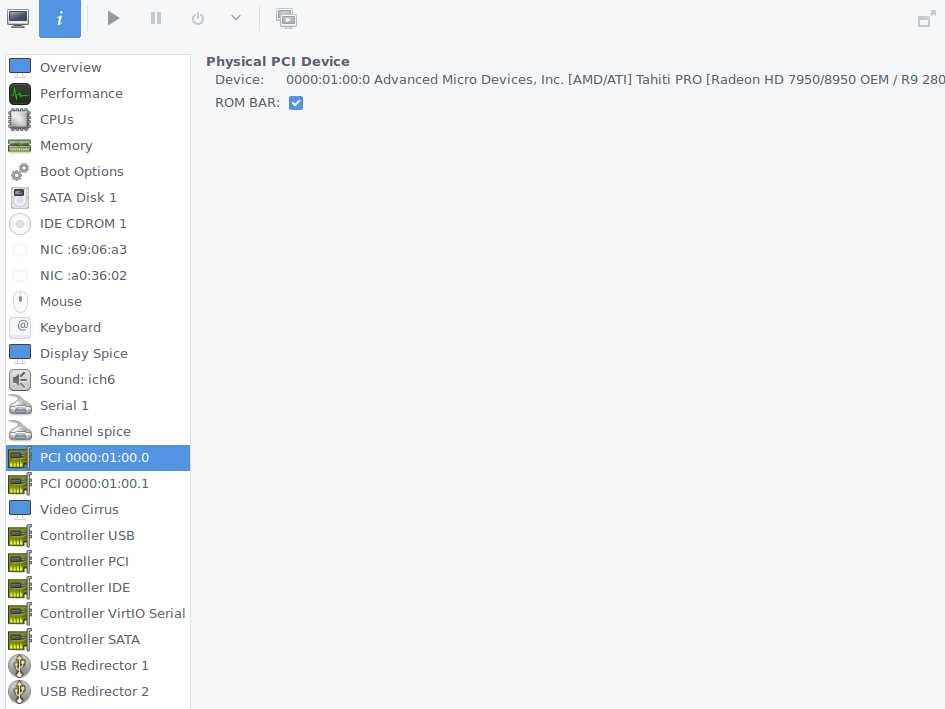
Wouldn’t want to forget this.
Hugepages backing: This is the one thing you need to dip out of the friendly GUI for. Run sudo virsh edit <name of VM> and add this before the <os> XML tag.
<memoryBacking
  <hugepages/>
</memoryBacking>
You might also want to configure CPU pinning for extra performance, but I haven’t bothered. Reboot your PC after making this edit and before attempting to boot your VM.
You’ll probably want to keep the default Video, Display and Channel devices on the VM, so that you can use KVM’s SPICE interface (KVM’s built-in desktop viewer) to control the system while you install Windows. You can always remove them later.
Finally, add your Windows ISO and VirtIO ISO as virtual CD ROM drives, and then boot and get to installing.
# Using a bash script
Doing this gives you finer control over your VM than the virtman GUI and maybe gives you extra coolness points? Anyway, this is the approach taken by this guide and the venerable Arch wiki.
You’ll need to create your VM’s disk first.
# 250G virtual disk (adjust according to your needs).
dd if=/dev/zero of=<storage>.img bs=1M seek=250000 count=0
The VM script, which you’ll run every time you want to start your VM, should have this general structure:
#!/bin/bash

## DEVICE PASSTHROUGH

configfile=/etc/vfio-pci.cfg
vmname="windows10vm"

vfiobind() {
   dev="$1"
        vendor=$(cat /sys/bus/pci/devices/$dev/vendor)
        device=$(cat /sys/bus/pci/devices/$dev/device)
        if [ -e /sys/bus/pci/devices/$dev/driver ]; then
                echo $dev > /sys/bus/pci/devices/$dev/driver/unbind
        fi
        echo $vendor $device > /sys/bus/pci/drivers/vfio-pci/new_id

}


if ps -A | grep -q $vmname; then
   echo "$vmname is already running." &
   exit 1

else

   cat $configfile | while read line;do
   echo $line | grep ^# >/dev/null 2>&1 && continue
      vfiobind $line
   done

cp /usr/share/edk2.git/ovmf-x64/OVMF_VARS-pure-efi.fd /tmp/my_vars.fd

## VM INITIALISATION

qemu-system-x86_64 \
  -name $vmname,process=$vmname \
  -machine type=q35,accel=kvm \
  -cpu host,kvm=off \
  -smp 4,sockets=1,cores=2,threads=2 \
  -enable-kvm \
  -m 4G \
  -mem-path /run/hugepages/kvm \
  -mem-prealloc \
  -balloon none \
  -rtc clock=host,base=localtime \
  -vga qxk \
  -serial none \
  -parallel none \
  -soundhw hda \
  -device vfio-pci,host=01:00.0,multifunction=on \
  -device vfio-pci,host=01:00.1 \
  -drive if=pflash,format=raw,readonly,file=/usr/share/edk2.git/ovmf-x64/OVMF_CODE-pure-efi.fd \
  -drive if=pflash,format=raw,file=/tmp/my_vars.fd \
  -boot order=dc \
  -device virtio-scsi-pci,id=scsi \
  -drive id=disk0,if=virtio,cache=none,format=raw,file=<storage>.img \
  -drive file=<windows>.iso,id=isocd,format=raw,if=none -device scsi-cd,drive=isocd \
  -drive file=<virtio-win>.iso,id=virtiocd,format=raw,if=none -device ide-cd,bus=ide.1,drive=virtiocd \
  -netdev type=tap,id=net0,ifname=tap0,vhost=on \
  -device virtio-net-pci,netdev=net0,mac=00:16:3e:00:01:01

   exit 0
fi
The first part of the script will look the same for pretty much everyone, but you’ll want to make some changes to the VM initialisation based on your hardware and setup. For example, here’s what that guy I mentioned above whose hardware didn’t support UEFI boot used (note the line that starts with -bios):
## VM INITIALISATION

qemu-system-x86_64 \
-enable-kvm \
-M q35 \
-m 8192 \
-cpu host \
-smp 4,sockets=1,cores=4,threads=1 \
-bios /usr/share/seabios/bios.bin
-vga qxk \
-device ioh3420,bus=pcie.0,addr=1c.0,multifunction=on,port=1,chassis=1,id=root.1 \
-device vfio-pci,host=02:00.0,bus=root.1,addr=00.0,multifunction=on,x-vga=on \
-device vfio-pci,host=02:00.1,bus=root.1,addr=00.1 \
-device virtio-scsi-pci \
-drive file=<storage>.img,id=disk,format=raw,if=none -device scsi-hd,drive=disk \
-drive file=<windows>.iso,id=isocd,format=raw,if=none -device ide-cd,bus=ide.0,drive=isocd \
-drive file=<virtio-win>.iso,id=isocd1,format=raw,if=none -device ide-cd,bus=ide.1,drive=isocd1 \
-boot menu=on
The great thing about doing this with a script is you can add extra steps to set up all the comforts discussed in part 3 for sound, controls, and so on.
# Installing Windows
Boot your VM and follow the installation procedure through the SPICE interface. Purchase a Windows licence if you don’t already have one. This should be pretty straight-forward.
You probably won’t see video output from the GPU you’ve passed through during or immediately after the Windows installation. Don’t panic! Use the SPICE interface to download and install the appropriate drivers for your graphics card. Following a reboot, you should start to see video output from your passthrough devices.
Congratulations, you’ve just set up your Windows graphics passthrough VM! Continue to the next section for some advice on actually using this crazy new setup.
# Part 3: Using the VM
While parts one and two were mostly about just following the right tutorials (and thus mostly consisted of my summaries and paraphrasing), this part is going to contain information I had to work a bit harder for. Setting up the passthrough is easy enough, but once that’s accomplished you need to put a few things in place so that actually using your host and VM on a day-to-day basis is simple and hassle-free.
# Keyboard and mouse
You have a few different options for controlling your newly birthed Windows VM:
The QEMU/KVM SPICE interface: If you followed the last section, you’ll already be familiar with this. Using QEMU/KVM’s SPICE system, you can interact with your VM using an interface not dissimilar to one present in VirtualBox and VMWare Player. Mouse movement is a bit sluggish, so it’s not really something I would recommend, but it’s definitely possible to use your VM and even play games with SPICE.
When it’s enabled, the SPICE interface will act as an extra display. To interact with your VM, just click inside the SPICE window and move your mouse over to the main display you’re using for your graphics passthrough. To go back to your host, press Ctrl-Alt like you would with VMWare Player. It’s not totally elegant, but it seems to basically work (though I haven’t tested it thoroughly, and it’s not what I do).
A physical KVM switch: If you like buying physical hardware, you can get a KVM switch to plug your keyboard and mouse into, and toggle a physical switch to change between controlling your host and your VM. Again, not something I do, so I can’t say too much about how well it works in practice.
Two sets of keyboards and mice: If you don’t happen to have a KVM switch lying around but do have an extra keyboard and mouse, you could plug them in and pass their USB ports through to the VM. I imagine this would get very annoying.
Synergy keyboard and mouse-sharing software: This is what I do, and I think it’s the best option. For a once-off fee of $10, you can get access to Symless’s excellent network-based keyboard, mouse-sharing software4 for Windows, Mac and Linux, forever.
This was a no-brainer for me. I have both of my monitors wired to both graphics cards, and Synergy is configured to place the Windows VM above the Linux host. So to switch devices, I just move my mouse up or down and toggle the input on the relevant monitor. It’s far easier than dealing with a SPICE window or a physical switch, and using a KVM virtio network adapter for the connection, I notice no lag at all. Plus, Synergy allows you to share clipboard contents between devices (though I imagine that’s also possible with SPICE).
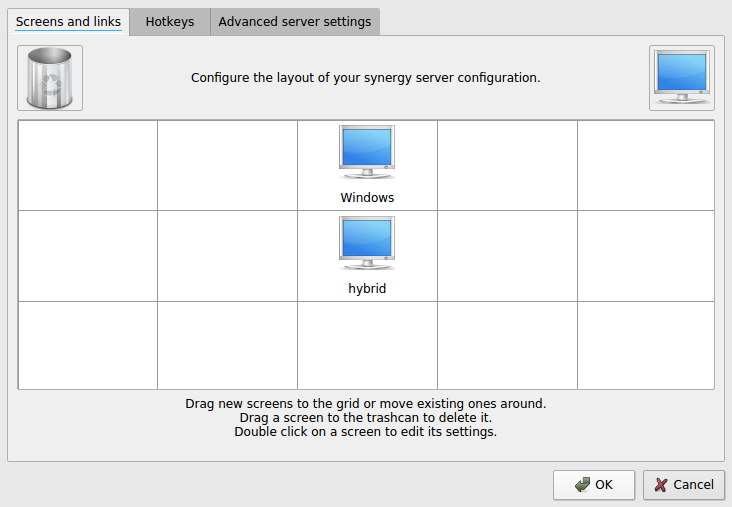
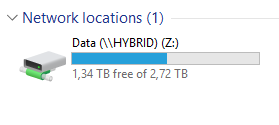
hybrid is the host’s name, for obvious reasons.
Setting up Synergy is pretty straightforward: you install it on your host and your VM, and you have the host act as the server and the VM as the client. There are just two important, non-obvious points you have to be aware of.
Point 1: by default, Synergy sends client devices absolute mouse co-ordinates, which makes it impossible to play 3D games where the camera is controlled by the mouse. In order to play these games, you need to do two things:
- In the Advanced server settings tab of Synergy’s Configure Server popup, enable “Use relative mouse moves”.
- Whenever you want to play a game dependent on relative mouse positions, press the Scroll Lock key to trap your cursor in your VM (press Scroll Lock again to release the cursor when you’re done). If your keyboard doesn’t have Scroll Lock, you can use the Hotkeys tab of this same dialogue to create a new keymapping for locking the cursor to a screen.
Point 2: The visual effects of the default Windows UAC settings will interfere with Synergy. When a program tries to run with elevated privileges but gets blocked by UAC, your screen dims and network connectivity seems to get briefly cut off while Windows pops up a dialogue box to ask if the program’s request should be granted. Obviously this is an issue when the mouse you’d use to click either Yes or No is provided by the network via Synergy.
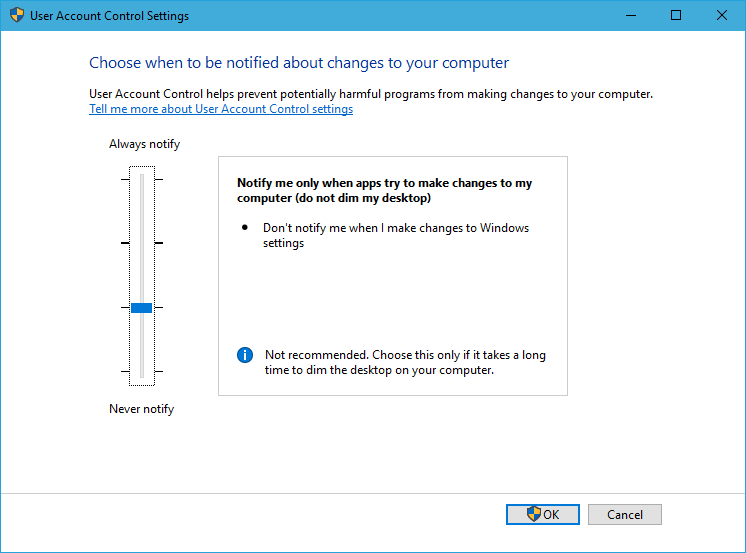
The solution is to slightly reduce UAC to make the popup less dramatic. Search for User Account Control in the Start menu and change this:
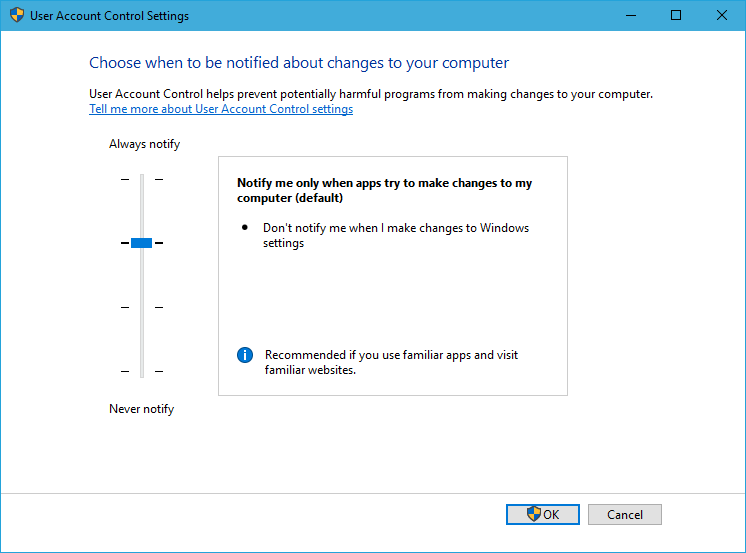
To this:
As an aside, GPU passthrough is probably not a great thing to set up on systems where security is a very high priority. Most security benefits of virtualisation are cancelled out once you start passing physical hardware through directly.
# Sound
The easiest way to get sound working in your VM is just to leave a SPICE window open on the host. Disable the SPICE graphics display if you want. I’ve been doing this because I can’t be bothered to develop any more grey hairs fighting with PulseAudio and ALSA.
The second easiest way to get sound working is to just use your graphics card’s sound card (if it has one) to power HDMI audio. This way, your VM’s sound will be completely separate from your host’s sound (which may be an upside or a downside, depending on what you want). I’m too lazy to unplug and replug my headphones in all the time, so I don’t do this.
The hardest, but probably most elegant way, is to set up KVM to pass sound from your VM to your host, i.e. fight with PulseAudio and ALSA. I fiddled with this for a while before giving up and going with option one. If you get this working, let me know how you did it.
# Fixing choppy sound
If you experience choppy sound on your virtual machine, try switching the VM’s sound device from the default ich6 to ac97. Windows doesn’t have any default drivers for this device, so you’ll need to download and install the AC97 drivers from Realtek’s website.
Unfortunately, these drivers aren’t signed, so to get Windows to accept and install them, you need to disable the enforcement of driver signing. To do this in Windows 10:
- Go to Settings –> Update & Security –> Recovery.
- Select Advanced Start-up.
- From the full-screen menu that appears, go to Troubleshoot –> Advanced Options –> Start Up Settings and then select Restart.
- After the restart, choose option 7, Disable driver signature enforcement by pressing 7.
Then you will be able to install your downloaded Realtek driver from Device Manager in the normal way.
# File sharing
It’s a good idea to set up a Samba share between your host and VM so that you can transfer files. To do this, first make sure samba is installed and then add something like the following to /etc/samba/smb.conf:
[Data]
path = /path/to/your/share
available = yes
valid users = yourusername
read only = no
browsable = yes
public = yes
writable = yes
Then give your user an SMB password with:
sudo smbpasswd -a yourusername
And finally restart the service:
sudo service smbd restart
Then you can connect this share as a Network Drive on Windows, using yourusername:yoursmbpassword when prompted for credentials. I share my entire extra storage HDD drive in this way.
# Other
If you’d like to plug-and-play with USB devices on your VM, you can pass a PCI USB controller through in much the same way as you did your graphics card.
I’d like to have a section on network bridging here as well (i.e. placing your Windows VM on the same network as the host), but I haven’t had much success getting it to work. The default NAT network setup is sufficient for 99% of cases, but sometimes you need to bridge. Unfortunately, KVM is not VirtualBox where you can just select “bridge network on X physical adapter”.
I’ve heard it’s easier with an ethernet connection than on wifi, but unfortunately the logistics of my living space restrict me to the exclusive use of wifi for network connectivity. I’ve tried a couple of tutorials and things, but none have really worked well. If you have any idea, let me know.
# Part 4: Closing thoughts
So, passthrough: not a small bit of work, but very, very well worth the effort. I can say without hyperbole that setting this up is one of the best things I’ve ever done with a computer. It’s literally the best of both worlds, and after running this setup for four months, I couldn’t imagine going back to a Windows base. If you’ve ever wanted to use a setup like this, I can 100% recommend putting in the work and just doing it.
Corrections, caveats, suggestions and stories of your experiences with passthrough can be emailed to me at d@vidyat.es or tweeted to me @davidyat_es.
This solution scales. If you’ve got enough hardware, spin up another couple VMs and have a single CPU LAN.
# Bibliography
I’ve tried to make this post as comprehensive as possible, but please refer to these resources as well if you actually decide to set this up. Most of them have been linked above as well.
- How to make dual-boot obsolete using KVM VGA passthrough – Linux Mint Forums
- GPU passthrough revisited – reddit
- PCI passthrough via OVMF – Archwiki
- Alex Williamson’s VFIO Tips and Tricks blog
- Multi-OS gaming without dual-booting – Rafał Cieślak
- Create a gaming virtual machine using VFIO PCI passthrough for KVM – firewing1
- Multiheaded Nvidia Gaming Using Ubuntu 14.04 + KVM – Puget Custom Computers
- Passthrough entire USB controller – Lime Technology Forums
- Linux and Windows running simultaneously with GPU passthrough | It’s Taxes
While I’ve tried a number of other distributions, none have really appealed to me the way Ubuntu does: it’s stable, actively maintained and updated, and comes the closest of any Linux distro to the fabled “just works” of commercial operating systems. I’m not perfectly happy with Unity5 or Nautilus6, but it’s still Linux, so I can change the window manager, file manager and anything else I don’t like post-install. ↩︎
Maybe it’s just me, but I’m sure Windows is much more BSOD-happy in this emoticon era. When you got an old-style, chunky white text on dark blue BSOD, you knew something had gone down, and that you’d have to spend at least half a day in recovery dialogues before Windows would boot again. Nowadays everything’s usually fine after the mandatory restart. It just doesn’t have the same “of Death” gravity anymore. ↩︎
Growing up a Windows user, I think you develop a greater trust for GUIs than the command line. Even as I dive further down the *nix rabbit hole, there’s a (false) sense of solidity and comfort in using the occasional GUI that I can’t pretend doesn’t appeal to me. ↩︎
There’s also a $29 version that encrypts the connections. Not super necessary here as you’ll be using an entirely internal virtual interface for your Synergy traffic, but if it makes you happy, go for it. ↩︎
Though better Unity than the different-for-the-sake-of-it hot-corner madness of Gnome 3. ↩︎
The Nemo fork (which I use) hasn’t experienced the same level of feature removal. ↩︎