 David Yates.
One of the reasons for the Web’s triumph over the Gophernet in the early 90s is its superior organisational structure. Hypertext links allow any one page to be linked from any other page without regard for hierarchy or location,1 but you can still define hierarchy and location like you would in a filesystem. Early on, in 1994, Ward Cunningham invented the wiki, a sort of mini-web that leveraged the associative power of hypertext linking within a single website. This was good, and it paved the way for the creation of the world’s greatest encyclopedia.2
Hypertext is an incredibly powerful tool for organising information because it allows you to organise things not only in traditional hierarchies and lists, but also lets you make arbitrary links between material. Using Wikipedia, if you want to switch from an article on Colonel Sanders to one on the Great Depression, you click the words “Great Depression” as they appear in the summary of the Colonel’s life rather than, say, jumping back to an index page or doing another search.
Good wiki software provides an easy-to-use interface for making these sorts of connections by letting you link with syntax less verbose than <a href="urlofpage">Nameoflink</a>. Ergo, the best encyclopedia in the world is a wiki and the best way to organise your notes is in a personal wiki.
# Making a personal wiki
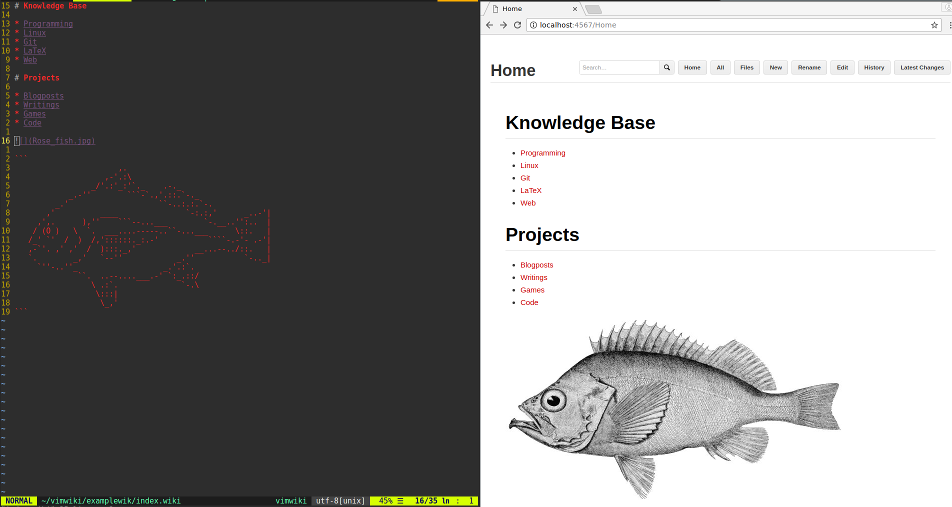
I use Vimwiki, a feature-rich plugin for Vim that allows you to create a plaintext wiki with all the usual Markdown formatting, todo lists, syntax-highlighted codeblocks and even a diary for making daily notes.
Vimwiki is easy and intuitive. In Vim, you can open the index page of your wiki at any time with <leader>ww. From there, creating additional pages is a matter of writing a single-word page name and pressing Enter on it. Navigating to the previous page is done by pressing Backspace (in normal mode of course).
So Vimwiki is great for plaintext notes, but sometimes you want pictures, or at least to read something in better typesetting than that afforded by a terminal-based text editor. That’s where Gollum comes in.
Gollum is a wiki built on top of the Git source control management system. Source control management (or version control) systems are best known for dealing with programming code, but can be used for anything that mostly involves plaintext files.3 Gollum is small and lightweight, but manages to implement everything you could reasonably want from a wiki: links between pages, basic text formatting, page creation, modification and deletion, full text search, and a substantial number of text formatting options.4
# Step 1: Preparation
Install Vimwiki through your favourite Vim plugin manager (I recommend Vundle), and install Gollum by typing gem install gollum (first install Ruby, preferably through RVM or rbenv). This can all be done on Linux, Mac or Windows, but if you’re using Windows and don’t hate yourself more than average, do it through WSL.
Once both are installed, it’s time to conjoin them. For interoperability with Gollum, configure Vimwiki to use Markdown formatting5 by specifying the following in your ~/.vimrc:
let g:vimwiki_list = [{'path': '~/vimwiki/', 'syntax': 'markdown', 'ext': '.wiki'}]
This directive sets two things: the location of your wiki (in this case /home/USER/vimwiki/, but you can change that if you want) and the wiki syntax. We’re setting the markup syntax for your wiki to Markdown but leaving the extension for wiki files as the default .wiki. If we were to change it to .md, Vim would start seeing all .md files as files of type vimwiki rather than of type markdown, which we (or at least I) don’t want.
It’s fine, we can do this – file extensions are meaningless. But once we add Gollum into the mix, we hit a snag. Gollum decides on what markup to use on a given page from its file extension – file extensions are meaningful. It does this by passing rendering duties to github/markup, a gem made for the express purpose of rendering different markups depending on file extension. Because of this, I submitted a pull request to decouple file extensions from markup formats, which was included in gollum-lib 5.0, released in March 2020.
In Gollum 5.0.0 and newer (check your version with gollum --version), you just need to tell Gollum which format we want to use and what file extension should be associated with it.6 Do this by creating config.rb in ~/vimwiki/ (or wherever you want your wiki) and filling it with:
# always include this:
Gollum::Page.send :remove_const, :FORMAT_NAMES if defined? Gollum::Page::FORMAT_NAMES

# first remove all markups:
Gollum::Markup.formats.clear

# and then define the sole markup to be supported:
Gollum::Markup.formats[:markdown] = {
    :name => "Markdown",
    :extensions => ['wiki'],
    :reverse_links => false
}
If you’re still on Gollum 4.X, things get a little more complicated…
Click here for Gollum 4 instructions
Alternatively, you can just specify .md as the extension for your Vimwiki files and not bother with the above. The only downside is that Vim will treat non-wiki markdown files as vimwiki files, which isn’t really that bad.
# Step 2: Creation
Now we can actually create the wiki. In your wiki’s root directory, initialise a Git repository. Gollum will use this to track your wiki’s history, so you can never lose text or whole files from a single fat-fingered accidental deletion:
git init
Then we can start Gollum with:
gollum --config=config.rb
Leave the flag off if you didn’t need to write a config.rb.
Navigate to the webserver Gollum starts at http://localhost:4567 and you’ll be prompted to create a homepage for your new wiki. This page will be stored as Home.wiki and will serve as an entry-point for your wiki. You’ll probably want to make it an organised table of contents. For now, put some placeholder text there and save the page.
This homepage presents something of an interoperability snag with Vimwiki, as Vimwiki recognises index.wiki as the wiki’s homepage, rather than Gollum’s Home.wiki. Rather than having two homepages for the same wiki (though this is a perfectly viable option if you prefer it), let’s symlink Home.wiki to index.wiki.7
ln -s Home.wiki index.wiki
Now we can bring in Vimwiki. Open Vim and press <leader>ww (if you haven’t encountered Leader before, it’s /). Write some text to index.wiki, and then run:
git add --all .
git commit -m "First use of Vimwiki!"
Refresh the Gollum homepage in your web browser to see your changes reflected.
Tada!
# Step 3: Customisation
The obvious next step is to create some wiki pages. Depending on your mood, this can be done through Vim in Vimwiki or through the web interface in Gollum. Note that you will have to manually git add and git commit file creations and changes done in Vimwiki for them to be recognised by Gollum – I recommend a script like this (and maybe a cron job to go with it):
#!/bin/sh

git add --all .
git commit -m "Changes"

# more descriptive/dynamic commit messages left as an exercise for the reader.
We can also apply some neat customisations to our new wiki, both in the Vimwiki and Gollum views.
# Customising Vimwiki
We can get code syntax highlighting in code blocks for any language known to Vim by specifying these languages in ~/.vimrc. Here’s mine:
let wiki.nested_syntaxes = {'ruby': 'ruby', 'python': 'python', 'c++': 'cpp', 'sh': 'sh', 'racket': 'racket'}
Codeblocks to highlight are written like this:
```ruby
Gollum::Markup.formats[:wiki] = {
  :name => "Markdown",
  :extensions => ['wiki'],
  :reverse_links => false
}
```
As a bonus, if Pygments is installed on your system, this syntax highlighting will automagically work in Gollum as well.
We can also tell Vimwiki to use pretty, alternating colours for different heading levels (as in the top screenshot on this page) by adding this to ~/.vimrc
let g:vimwiki_hl_headers = 1
# Customising Gollum
We can write custom CSS for Gollum by creating a custom.css file in our wiki’s root directory and running Gollum with the additional flag --css.

A few of my own style changes – smaller headings, different font, background colour, less button-y buttons, etc.
Gollum also lets you create custom macros, useful for specifying often-used, complex formatting not supported by Markdown. For example, you’d want to define a macro to create image captions, or something like the yellow pop-out info boxes I used above.
# Step 4: Preservation
Beyond version history and the timey-wimey shenanigans of branching and merging and rebasing, Git also provides distributed backups. Create a repo with your favourite Git host(s) (and/or your own server), set it as a remote and remember to git push every now and then. This will also allow you to keep an up-to-date version of your wiki on multiple devices.
# In practice
I do most of my writing and editing in Vimwiki (them keybindings, man), and use Gollum for reading and browsing around, especially for pages with pictures and/or lots of formatting. I imagine the setup could also be useful for wikis with multiple editors, where one person wants to use Vim and another person prefers the web interface.
Lastly, I should mention that Vimwiki provides its own impressively robust functionality to generate HTML output from wikis (:Vimwiki2HTML), but it only supports the default, non-markdown syntax, and doesn’t have many features Gollum provides such as graphical history and site search. So if you just want HTML conversion and don’t care for Markdown, that might be the way to go, but otherwise I think this is a far better solution.
This caused some controversy in the early days of the web. ↩︎
The Digital Antiquarian provides a more comprehensive survey of the history of hypertext in this post . ↩︎
I use Git for everything from my code to this blog to the novel I’m slowly, painfully writing. ↩︎
Authentication is provided through a separate project, OmniGollum ↩︎
Vimwiki defaults to a custom markup that’s not quite MediaWiki, not quite Markdown. It’s not horrible to use, but you’ll never see it anywhere else. ↩︎
By default, Gollum provides a large array of syntax options, all of which can be used in the same wiki. I prefer to stick with one. ↩︎
It’s best to use
index.wikias a symlink toHome.wikirather than the other way around if you want to be able to edit the homepage in both systems. Vimwiki will invisibly follow symlinks, but Gollum will overwrite them with files. ↩︎